I realize that most teachers do not have the luxury of spending much time on this topic, given that is is woefully underemphasized in the Common Core, but some or all of the unit may be well suited to math circles and clubs, elective courses, and preservice teacher education.
- Here are some reasons to teach students about symmetry:
- - It is interesting and appeals to a wide range of kids
- - It ties in with a curricular topic (geometric transformations)
- - It connects with art and culture, in fact with many cultures
- - It offers opportunities for student creativity
Throughout the unit, I link to some online activities for remote learning, as well as some paper-pencil / hands-on activities for use in the classroom. Some links are to Geometry Labs and to the grades 1-6 unit I created for the Museum of Math (MoMath). Those resources include teacher notes and lesson plans originally written for in-person instruction. Most links to non-virtual materials are on a dark background. Still, they may be useful even if teaching remotely.
Three Types
In plane figures, symmetry occurs in three types. Rosette symmetry is found in finite figures, such as these:


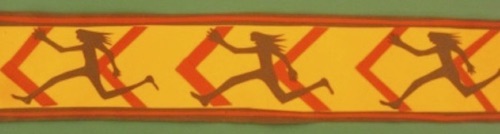
Frieze symmetry is found in figures that extend infinitely in one dimension, such as the one suggested by this student-created image:
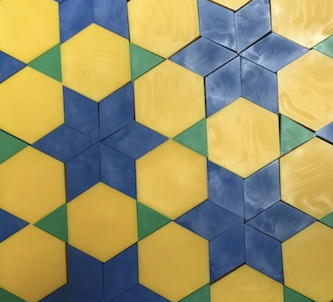
Wallpaper symmetry is found in figures that extend infinitely in all directions, as implied by this pattern block tiling:
This unit is organized in three parts, corresponding to those three types. In each case, the sequence for introducing the basics of symmetry involves three steps:
- Recognizing symmetries in images
- Finding symmetric designs in the world
- Creating symmetric figures
To go beyond the basics, you will need to make connections with other math domains, such as geometric transformations and perhaps an introduction to abstract algebra.
Rosette Symmetry
What is Symmetry?
Make a copy of these slides, and use them to lead a discussion about line (mirror) symmetry and rotational (turn) symmetry. There are some speaker notes on each slide.
You cannot use the slides in presentation mode, as you will need to manipulate images (drag, rotate, and flip them), which cannot be done in presentation mode. If rotating images "manually" (as opposed to using the menu command), pressing shift as you do it, makes it turn in 15° increments, making it easier to stop at (e.g.) exactly `180°`. However do not press shift if turning, say, `72°`.
The order of the rotation is the number of positions for which a figure appears to be unchanged. If there is no rotational symmetry, there is just one such position. If there are three such positions (e.g. for an equilateral triangle), then the order is 3. The order multiplied by the rotation angle equals `360°`. In this case, `3 * 120° = 360°`.
Standard terminology e.g. for a square is "4-fold rotational symmetry". This is unfortunate, as folds have nothing to do with rotational symmetry. This is particularly confusing because folds do have something to do with mirror symmetry. To keep things simple early on, I now say "4-way rotational symmetry" when working with beginners.
These slides and the ones in the next section correspond to Geometry Labs 5.1, to the lesson plan on pp. 4-7 of the MoMath unit, and the handouts on pp. 1-4 and 17.
Recognizing Symmetries
Use these slides for students to work in up to nine breakout rooms. They are to enter the order of rotational symmetry for each figure (1 if there is no rotational symmetry) and show the mirror lines. The mirrors can be drawn using the line tool, or by dragging the existing red line segments, and turning them as needed.
Each group has its own six figures to analyze. If a group is done, or if they need help understanding the instructions, they can look at other groups' work, since everything is in the same document. Once most groups have labeled most of their figures, you can discuss any remaining questions. (One issue is whether to take color into account: in some cases, if the figure was not divided into black and white regions, the symmetry diagnosis would be different. You and your students may choose to ignore color.)
Symmetry Scavenger Hunt
You can ask students to look for symmetric figures at home (e.g. logos on commercial products, images in printed materials), in the street (e.g. hubcaps, maintenance hole covers), or in nature (e.g. flowers, leaves). They can sketch or photograph what they find, to share in a future session.
If you want to present symmetric images from just about every culture in the world, I recommend Peter S. Stevens' book, Handbook of Regular Patterns (MIT Press, 1980).
Use these slides as examples.
Making Symmetric Designs
Students can make symmetric pattern block designs using this applet, and put screenshots of their creations in these slides. You can also keep track of their work on this chart. (All this is an online version of Geometry Labs 5.6, where you can find some discussion questions to follow up on the activity.)
As an extension, students can make symmetric designs using this Spirograph simulation, and explore the relationship between the parameters and the symmetries.
(If you come up with a worksheet to guide such an exploration, please share it with me, and I may add it to the site — crediting you, of course.)Students can make symmetric tangram designs, as suggested in Geometry Labs 2.4, using physical tangrams or this applet.Students can make symmetric pentomino designs, as suggested in the MoMath lesson plan (pp. 10-11) and handouts (pp. 13-15). In the absence of physical pentominoes, they can use this applet.
There is a fun set of puzzles involving mirrors in the MoMath lesson plan (pp. 8-9) and handout (p. 5-11.)There is a paper-and-scissors activity in the MoMath lesson plan (pp. 12-13) and handout (p. 18.) It was inspired by Katherine Paur's terrific set of paper-scissors symmetry puzzles: Cutting Out Hearts.
A follow-up to the pattern block designs is Kaleidoscopes (see MoMath lesson plan pp. 14-15, and handout p.19) and the big pattern block dodecagon.
This MoMath lesson plan (pp. 16-17) asks the students to create symmetric designs using pre-drawn mirror lines in this packet (pp. 1-16)
Math Connections
An interesting way to discuss special triangles, quadrilaterals, and regular polygons is from the point of view of symmetry. Students can work on this collaboratively in breakout rooms using these slides. Instructions:
- Find the image of the polygon(s) that could be defined by the symmetry properties listed on the slides.
- Use the Line tool to draw the lines of symmetry.
- Enter the polygon's names in the appropriate spaces. (Use the mathematical name, not the color name indicated in some figures.)
- Use the Scribble tool to cross out asymmetric figures.
Make sure to reconvene with the whole group to discuss answers and settle disagrements.
There are teacher notes and answers in the PDF version of this activity: Symmetric Polygons (co-authored with Lew Douglas).Symmetry is also related to group theory. I share some pre-college lessons on that topic on my Abstract Algebra page. Most relevant are Lessons 4 and 5 in the Lessons packet.
Frieze Symmetry
Prerequisites
- From here on out, in addition to rotation and reflection, students will need to be familiar with the other two isometries: translation and glide reflection. (Isometries are also known as rigid motions.) Here are some useful links:
- introduction to the isometries: paper-pencil
- introduction to the isometries: online applets
- an article about the glide reflection
This is also a good time for a more formal definition of symmetry: a figure is symmetric if it is invariant (unchanged) under one or more of the four isometries. (Individual points in the figure can move, but the figure as a whole appears unchanged.)
Discovering the Seven Groups
Rosette symmetry exists in an infinite number of varieties, since the order of rotation can be any number. Frieze symmetry is much more constrained: from the point of view of symmetry, there are only seven possibilities, all of which involve translation symmetry. This one involves only translation symmetry:
... L L L L L L L L L L L L ...
This one also involves a glide reflection:

Students can arrange L's in one or two rows to try to discover all seven possible combinations. They can work on paper, or use these slides. They should label each design with a list of its symmetries.
See the MoMath lesson plan (pp. 18-20).
Recognizing the Seven Groups
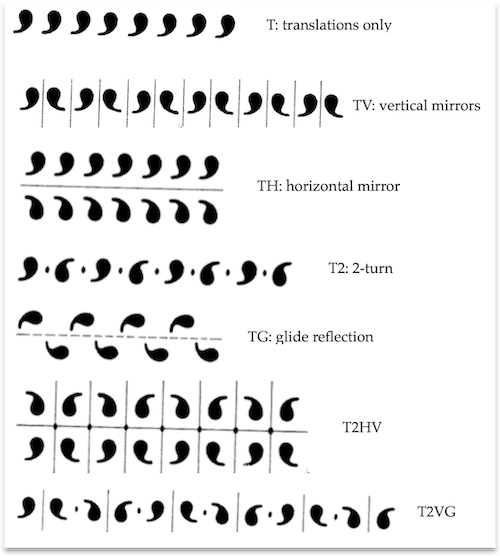
As it turns out, there are at least seven notations for the frieze symmetry groups, and none of them are easy to learn or remember. Since it is not expected or important that pre-college students learn any of these notations, I suggest the following straightforward scheme:
(Admittedly, this notation is flawed in that it assumes the frieze extends horizontally rather than any other direction, but its user-friendliness makes up for that.)
You can use this slide to introduce it, and these for students to practice identifying the groups. (Images are from Stevens' invaluable Handbook of Regular Patterns). The red items can be used to show mirror lines (line), glide reflection lines (dotted line), and centers of rotation (oval).
To deconstruct additional frieze images, see these photos I took (mostly high school student creations). You can also browse Stevens' book for a multicultural, international take on this — a selection can be found on pages 20-24 of the MoMath handouts.
Finding Friezes
As in the case of rosette symmetry, students can be asked to find and sketch or photograph frieze patterns out in the world or at home.
Making Friezes
Each student can be assigned one of the seven groups, and asked to create a design with those symmetries. (I usually allow students to trade assignments with each other, as some prefer simpler patterns, and others prefer more complicated ones.) One way to facilitate this project is for students to work on triangle paper, or grid paper, or virtual grid paper. Or you can team up with an art teacher who can suggest ideas for various media.
See the MoMath lesson plan (pp. 21-22).
Wallpaper Symmetry
Seventeen Wallpaper Groups
From the point of view of symmetry, there are seventeen wallpaper groups. Expecting students to find them all (as we did for the frieze groups) is not realistic.
As an introduction for teachers, I analyzed one wallpaper pattern in depth on my blog. In the first post, I showed how different-looking patterns can have the same structure from the point of view of symmetry. In the second post, I showed that just knowing that a pattern contains a mirror and a 60° rotation is enough to determine the whole pattern — evidence of how constrained wallpaper designs are.
Analyzing Wallpapers
Students can analyze wallpaper designs. Stevens' Handbook of Regular Patterns is a phenomenal compendium of such images. You can also look at my pattern block Wallpapers Catalog. Finally, a search on the Web should yield many examples, such as Islamic tilings and Escher prints. In examining these designs, students can look for the four symmetries.
Translations: There are of course an infinite number of translation vectors, but all are combinations of two short non-parallel vectors, which should not be too hard to find.
Rotations: All wallpaper designs have rotations of order 1, 2, 3, 4, or 6. Some have combinations of those. Students should look for the centers of rotation.
Reflections: Students should look for mirror lines. Note that wherever two mirrors intersect, we have a center of rotation.
Glide Reflections: Students should look for the reflection lines and the corresponding vectors.
An extension, after students have some practice, would be to identify the group a given design belongs to, perhaps using this guide in Wikipedia.
Finding Wallpapers
As in the case of rosette and frieze symmetry, students can be asked to find and sketch or photograph wallpaper patterns out in the world or at home.
Making Wallpapers
- One way for students to create wallpaper designs is by tiling the plane. The symmetry of student-created designs can be analyzed as suggested above.
- Tiling home page
- MoMath Lesson plans (pp. 23-27) and Make a Design packet (pp. 18-31).
Math Connections
I've taught much of this material in my Space course, a post-Algebra 2 elective. Most relevant is the unit on Isometries of the Plane. See also my Transformational Geometry home page for related topics.